

How To Draw A Portrait In Photoshop Tutorial
There is an innumerable corporeality of articles and tutorials teaching parts and pieces of retouching portraits. Nevertheless, finding the ones with quality techniques and information tin have days. Furthermore, in that location is no singular tutorial that teaches a consummate set up of methods to retouch portraits costless of accuse. Finding the correct tutorials for each aspect of editing tin become very time consuming. This commodity contains 5 years of research for achieving the greatest methods to retouch a portrait. Earlier diving into the material of the article, it is important to note that the quickest, most efficient mode to proceeds the cognition on retouching is probably 1 of the paid tutorials. For beauty and studio photographers, Michael Woloszynowicz has the perfect tutorial on high-end retouching. He is not only gifted with his photography and retouching, only also in delivering over information in a clear and concise fashion. Anyone on any level tin can understand the data. For portrait photographers interested in learning a quick and easy way to retouch portraits, while likewise making them pop, I released a tutorial a few months ago with RGGEDU. In this tutorial I have y'all on ix portrait sessions in dissimilar locations using natural light only and I share my entire mail service processing workflow for each shoot. Additionally I include my activity that allows you to knock out edits within 15 minutes. Some other quick affair I'd similar to betoken out is the false concept that "information technology's all near the editing". IT'S Non. Editing an image will just take a great photo over the edge. It volition not change a bad photo into an excellent photo. The purpose of the methods I'm most to share is not to change the photos, rather to enhance it. Culling images is simple. The importance of it is often overlooked. Even with the best retouching methods, if the right photo to edit wasn't chosen, the results won't be heady or pleasing to the eye. Choosing 3-5 images out of 500 from a photoshoot is hard. In fact, it's an fine art-form. I've found the all-time way to narrow it down is to select 35 images and then testify information technology to friends and family and permit their instincts help you. Some other of import affair to think is that information technology is always best to get with the more natural poses. While creativity is important, it is equally of import to not overdo things and effort likewise difficult. There is no technique to alternative. It is all about finding an image that is pleasing to the homo eye. And that is what makes it the virtually hard because there is a tremendous corporeality of subjectivity involved. That is why it is best to share it with as many people as you lot can. Forget about a technically perfect prototype. Find an epitome that speaks to you and your friends. For more on this, cheque out the post-obit article: A Technically Perfect Photo is Meaningless To choose images: Open adobe span - navigate to the folder with images - hit the space bar and utilise the arrow keys to navigate - hit any number between ane -5 to rate the epitome - hit the infinite bar again and then press enter (this opens the image in CameraRaw or Photoshop). People often confuse Camera Raw as the place where special effects and filter adjustments are made. However, CR helps create a foundation for which to continue editing on Photoshop. CR is not where amazing results happen. It's used to make RAW adjustments like, bringing dorsum some detail in the highlights, adjusting the white balance. With that in mind, information technology is of import to avoid making global adjustments similar using the exposure and contrast slider. Adding contrast is something that can be done manually in the editing procedure, if you add contrast in CR you lot will notice toning issues on the peel and eyes becoming dark and unrecoverable. If in that location is something small that is bothersome, for example the skin is on the darker side, there are methods to brightening that without using the exposure slider which over brightens the groundwork in the process. Hit up the luminosity slider, the orange and red slider tin be used to brighten the skin and leave everything else solitary. Clarity is frowned upon merely about x usually makes the prototype pop and makes dodging and burning easier. It will brand flaws such as pimples stand out more but that'south ok since you lot volition spot heal that afterwards anyways. This tutorial shows you how to spot heal blemishes in the pare, you can use this for devious hairs on the skin as well. Practise NOT take his advice on using the patch tool for the bags under eyes. This is a huge nono since you mess with the textures. I will explain under the next section of this article how to gear up bags. https://world wide web.youtube.com/sentry?v=zJ_B9bbEe7M The purpose of frequency separation is to gear up mismatched skin tones. Here'south a tutorial that explains it. If you find this method to be lengthy and you're loosing patience jump to the next video that will teach you a more uncomplicated method to fixing skin tone issues. If the to a higher place video is too advanced and lengthy, check out this method I figured out to fixing mismatched skin tones. This is how you would get rid of numberless under the eyes: Once we are on the subject field of fixing skin tones problems make certain to watch the following 2 videos on getting rid of redness in skin Dodging and called-for is probably the virtually important part of your workflow. It'southward the hardest to main but too the nigh rewarding. Before clicking on the following video agreement where to contrivance and burn is near of import. The tools and methods you use to contrivance and burn is uncomplicated and actually isn't important. Understanding where and how much to dodge and fire is the key to success here. Check out this article I wrote last year that will help clarify where to contrivance and fire "A Makeup Tip I Wish Someone Had Told Me When I Started Photography" Again, there are dozens of means to dodging and burning, and so don't go hung upwardly on the tools to use. Concentrate on agreement where to exercise it and how much. Just follow the techniques used by makeup artists. They understand this best. I keep it elementary by using a new layer set to soft light and filled with 50% grayness. Then use a brush set up to 5% opacity and brush white to dodge and a black brush to burn. This is a method I saw in Scott Kelbey's book chosen Light it, Shoot it, Retouch it. I've already written the perfect article that will aid you make eyes pop and still look natural. "Agreement the Human Eye and How To Retouch information technology Naturally" I searched loftier and low for a YouTube tutorial on retouching eyes and haven't found one. Everything I've come up across is ridiculous methods with completely overdone results. To sharpen the eyes indistinguishable the layer, become to Filter > Other > High Pass, set information technology to 30. Then fix layer Blend mode to Soft Low-cal. Add a black mask. Utilize a white brush at 50% opacity and brush the eyes. Brand certain you're mask is selected when you're painting. Before you motion on take note: If you aren't happy with you image at this bespeak then the toning portion will not change how you experience about the image. The toning will never completely change a photograph and a lot of people out there arraign their lack of post product skill on the toning portion. Toning will just add together a little bit to an already solid image. Before nosotros spring into toning the cardinal thing to keep in mind is toning is not almost throwing on random colors and filters. this might piece of work 1 out of 20x. if you want to nailing the toning portion you lot need to have a articulate understanding for complementary colors. This goes beyond toning though. Its critical to proceed this in mind when picking wardrobe and location. Here'south a video that shows the ability of complimentary colors. My friend Nino Batista wrote an astonishing article on resizing images for social media worth reading. Personally I resize the prototype to 2100px on the long border using Photoshops Paradigm Size (CTr+ALT+I). I hope y'all found this commodity helpful. I'g all well-nigh sharing and helping others. Please consider sharing this article and helping beau photographers as well. 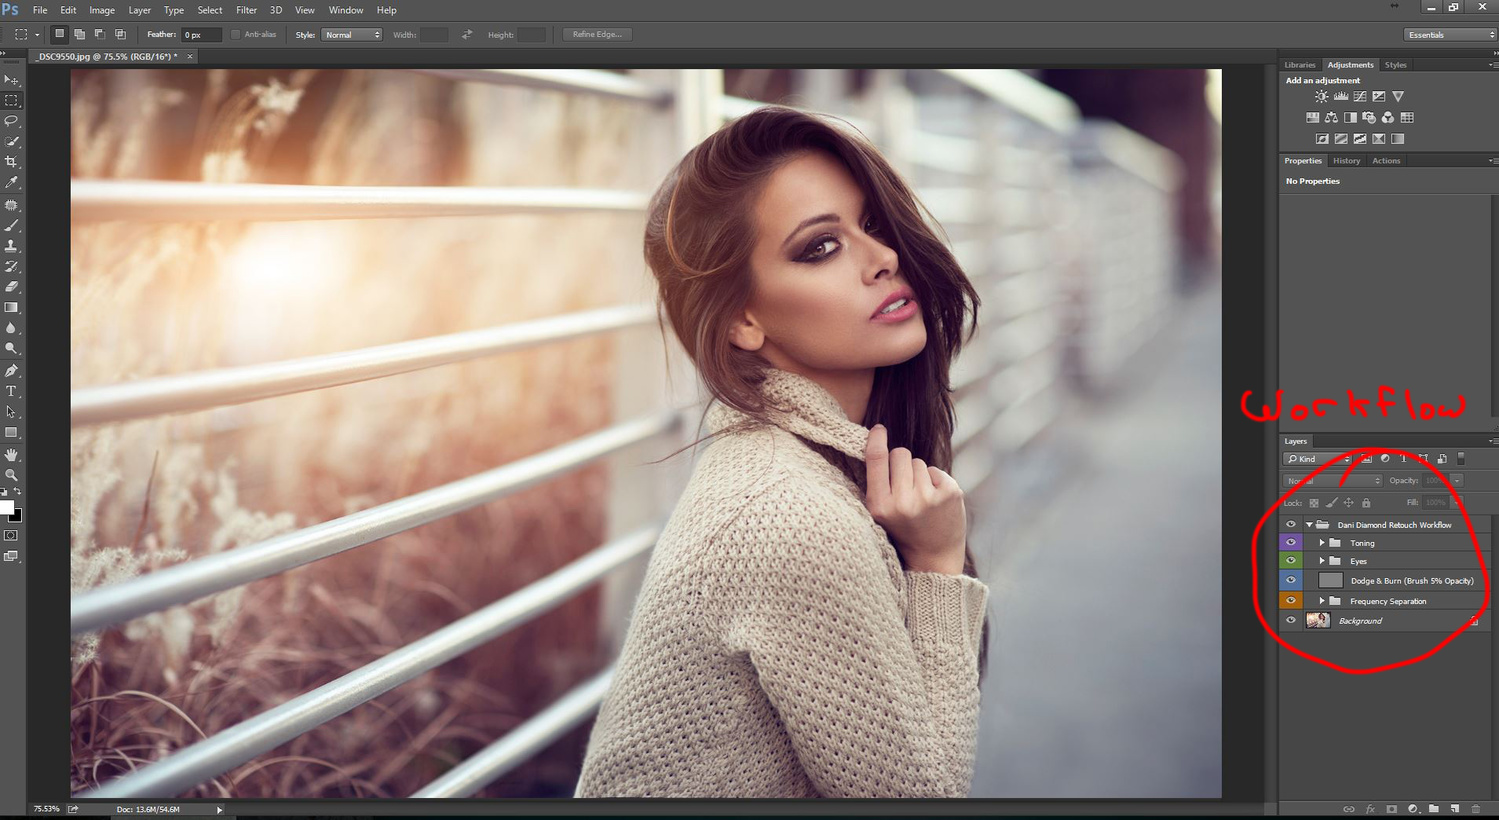


Alternative

Camera Raw
Photoshop
Spot Healing


Frequency Separation


Dodge & Burn down

Optics


Toning

Resizing and Saving

Source: https://fstoppers.com/bts/complete-guide-retouching-portraits-photoshop-free-98236
Posted by: weidmanatudeas.blogspot.com
0 Response to "How To Draw A Portrait In Photoshop Tutorial"
Post a Comment